The ability to manage your schedule, appointments, to-do's and basically your entire life is only a few clicks away with your Samsung Code.
This lesson will focus on how you can manage your life using the TimeSaver's Interface and your Calender.
1. Scroll the TimeSaver's Interface with the navigation wheel until reach the Calender Mini-Screen. It will look like this if you don't have any appointments:
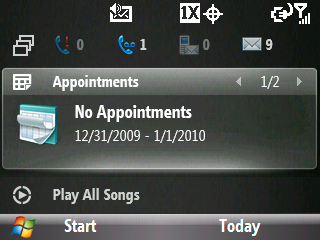
Or like this if you have an appointment (if you have multiple appointments, you will have a individual view for each appointment):
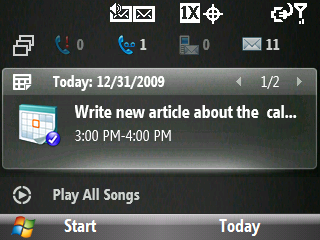
2. Hit the right soft key to select Today to access the daily calender view.
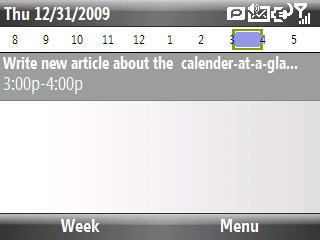
2a. Or hit the OK key to display your open appointment in a different view.
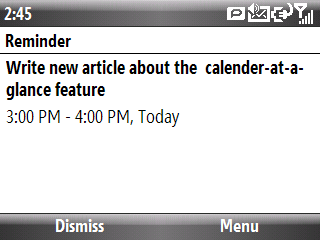
3. To access the weekly calender view, use your right soft key to select Today and then hit the left soft key to select Week.
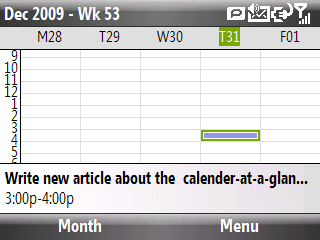
4. You can access the monthly calender view when in the weekly view by clicking the left soft key and selecting Month.
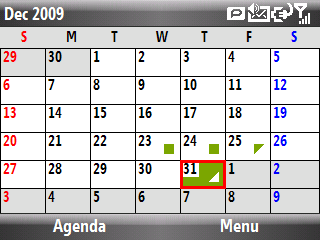
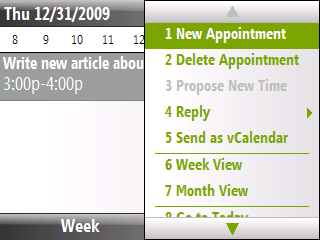
5. While in the daily, weekly or monthly calender view, hit the right soft button to select Menu so you can:
- Add a new appointment
- Delete appointment
- Send to vCalender
- Change the calender view
- Go to Today or a Select Date
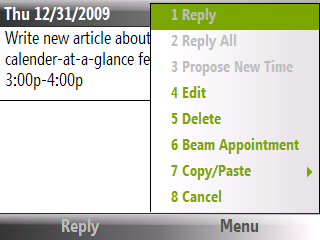
6. While in the view outlined in step#2, hit your right soft key to select Menu so you can:
- Edit appointment
- Delete appointment
- Beam appointment to another bluetooth device
- Copy/Paste the text in your appointment
Up Next: How To Navigate Your Quick List On The Timesaver's Interface
* This TimeSaver's m.Tip was written specifically for use with the TimeSaver's Interface. There is no guarantee this tip will work for you unless you have using the TimeSaver's Interface.
Thursday, December 31, 2009
m.Tip: Instantly Know Who Is Calling You Without Even Looking At Your Samsung Code
Would you like to learn how to harness the "power" to read minds or see the future? If so, this article isn't for you.
But, if you would like to learn how to assign individual ringtones to some or all of your personal & business contacts, then you have come to the right place.
This might be common knowledge for some of you, but as it isn't explained in the owner's manual, I thought I'd put a quick tutorial together for everyone else that hasn't found this on their own.
1. From your homescreen, select Contacts with your right soft key button.
2. Scroll your contact list using the navigation wheel and highlight the contact you would like to assign an individual ringtone to.
3. Press the OK key to open the contact file you wish to customize (you can also hit your right soft key to select Menu ---> Edit)
4. Scroll using your navigation wheel to the contact's name and hit the OK key (you can also hit the left soft key to choose Edit). This will open up the contact's record for editing.
5. Scroll down using your navigation wheel and sixth from the top, you'll find Custom ring tone.
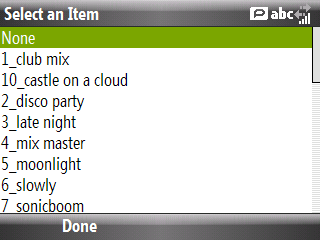
6. Scroll your ringtone library using either by hitting the OK key (this will bring a list of your ringtones that you can scroll quickly) or press the navigation wheel to scroll the list one at a time.
7. Once you have selected the ringtone you want, hit the left soft key to select Done and your changes will be saved.
__________________________________________________
Do you want to see more tips like this one? Check out the m.Tip Library to find all the m.Tips in one convenient place.
m.Tip: Want To Free Up Memory By Putting Your Ringtones On Your SD Card?
One of you recently wrote and asked, "Have you found a way to set mp3's on a storage card as ringtones? I have tried looking for a way, can't seem to do it. I hate to use up my device storage space for ringtones.", and to answer your question, yes I have and now all of you can learn how too.
1. Connect your Samsung Code and your PC using the mini-USB cable provided with your smartphone.
2. Turn on/activate Windows Mobile Device Center and make sure that your Samsung Code and your PC are connected.
3. Hover over the File Management folder and click on "Browse the contents of your device" to open up the File Manager.
4. Find your smartphone's main directory and open it up (by clicking once) to reveal the sub-directories for the smartphone's main memory and the storage card you have installed.
5. Click on the Storage Card directory to expand the directory tree on the right side of the File Manager.
6. Click on File ---> New Folder to create a new folder.
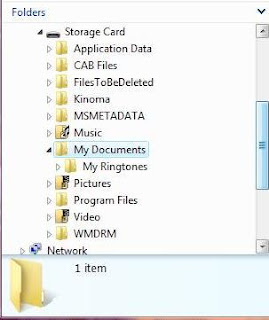
7. Rename the folder you just created My Documents.
8. While highlighting the new My Documents folder you just created, repeat step 6 to create another folder inside of the My Documents folder.
9. Rename the new sub-folder you just created My Ringtones so it looks like this:
10. Drag the ringtone you want to put on SD Card into Storage Card/My Documents/My Ringtones directory you just created.
For the sake of this article, I put my ringtone (it's called Create Your Own Custom Ringtones Using Itunes & A Song From A CD) on my desktop, but you can put it anywhere you want.
11. To confirm that the new ringtone has been added to your ringtone options, click the left soft key and select Start ---> Settings ---> Sounds ---> Ringtone.
12. Scroll your available ringtone library by pressing the navigation wheel and confirm that your new ringtone has been added.
Do You Want To Learn How Create Your Own Custom Ringtones Using Itunes & A Song From A CD? Come back to the The (samsung) Code Of Metro PCS to check out an article that will be posted in the next 48 hours.
__________________________________________________
Do you want to see more tips like this one? Check out the m.Tip Library to find all the m.Tips in one convenient place.
Wednesday, December 30, 2009
m.Tip: Want To Learn How To Hack Your Display Fonts On Your Samsung Code?
In her newest video tutorial, Ms. Yaya (or SSS as I fondly refer to her) aka Akehsay79 teaches us all how to change the display & system fonts on our Samsung Codes:
__________________________________________________
Do you want to see more tips like this one? Check out the m.Tip Library to find all the m.Tips in one convenient place.
__________________________________________________
Do you want to see more tips like this one? Check out the m.Tip Library to find all the m.Tips in one convenient place.
m.Tip: A Review Of The Samsung Code For Spanish Code Owners & Wantabees
In this new video, elkaiman is reviewing the Samsung Code and other phones in Spanish.
__________________________________________________
Do you want to see more tips like this one? Check out the m.Tip Library to find all the m.Tips in one convenient place.
__________________________________________________
Do you want to see more tips like this one? Check out the m.Tip Library to find all the m.Tips in one convenient place.
Tuesday, December 29, 2009
Timesaver's m.Tip: TimeSaver's Communications Interface Dissected-Quick Take On Emails
After you review your media messages, you have the opportunity to check your emails using using the TimeSaver's Communication Interface.
1. Toggle the navigation wheel to the Email Mini-Screen (you could have several depending on how email accounts you have set up on your Samsung Code).
2. If you have multiple emails, the Emails Mini-Screen will look like this:
2a. If you have only email, the Email Mini-Screen will inform you of:
- Your email service provider.
- The sender's name (or email address).
- The email's subject line.
3. To view your emails, hit the OK key.
Up Next: Calender At A Glance
* This TimeSaver's m.Tip was written specifically for use with the TimeSaver's Interface. There is no guarantee this tip will work for you unless you have using the TimeSaver's Interface.
Timesaver's m.Tip: TimeSaver's Communications Interface Dissected-Quick Take On Media Messages
After you review your text messages, you have the opportunity to check your media messages using the TimeSaver's Communication Interface.
1. Toggle the navigation wheel to the Media Messages Mini-Screen and the following information will appear:
- The contact's name of the last media message.
- The subject line for the last media message.
2. Press the OK key to open media message.
Up Next: Quick Take On Email
* This TimeSaver's m.Tip was written specifically for use with the TimeSaver's Interface. There is no guarantee this tip will work for you unless you have using the TimeSaver's Interface.
Timesaver's m.Tip: TimeSaver's Communications Interface Dissected-Quick Take On Text Messages
After you review your voicemails, you have the opportunity to check your text messages using the TimeSaver's Communication Interface.
1. Toggle the navigation wheel to the Text Message Mini-Screen:
1a. If you have more then one missed text message, the Text Message Mini-Screen will look like:
2. You can retrieve your text messages in one of two ways:
- Press the OK key.
- Press the Messaging Key.
Up Next: Quick Take On Media Messages
* This TimeSaver's m.Tip was written specifically for use with the TimeSaver's Interface. There is no guarantee this tip will work for you unless you have using the TimeSaver's Interface.
Timesaver's m.Tip: TimeSaver's Communications Interface Dissected-Quick Take On Missed Calls
When you have missed calls, this will be the first stop on the Timsaver's Communication Interface.
1. If you have multiple missed calls, the Missed Call Mini-Screen will inform you of:
- How many missed calls you have.
- The date and time of the last missed call.
1a. If you have only one missed call, the Missed Call Mini-Screen will inform you of:
- The contact's name (if the caller is in your contact list) or phone number (if the caller is not in your contact list) of the last missed call.
- The date and time of the last missed call.
2. To find out who called (when you have missed multiple calls) or to review the call history, do one of the following:
- Hit the right soft key to review Call History.
- Hit the OK key to review call history.
3. Once you have taken either the above actions, the missed call meter will reset to zero.
Up Next: Quick Take On Voicemails
* This TimeSaver's m.Tip was written specifically for use with the TimeSaver's Interface. There is no guarantee this tip will work for you unless you have using the TimeSaver's Interface.
Timesaver's m.Tip: TimeSaver's Communications Interface Dissected-Quick Take On Voicemail
After you review your missed calls, you have the opportunity to check your voicemail using the TimeSaver's Communication Interface.
1. Toggle the navigation wheel to the Voicemail Mini-Screen:
2. You can retrieve your voicemail in one of two ways:
- Press the OK key.
- Press the right soft key to select Voicemail.
Up Next: Quick Take On Text Messages
* This TimeSaver's m.Tip was written specifically for use with the TimeSaver's Interface. There is no guarantee this tip will work for you unless you have using the TimeSaver's Interface.
Timesaver's m.Tip: Consolidate All Communications In One Screen With The TimeSaver's Interface
If you have already installed the TimeSaver's Interface and played around with it, you already realize that the navigation wheel and OK key are the main devices used for navigation.
1. All of your communications will appear like this when you haven't highlighted the specific panel that holds this information:
2. Roll the the navigation wheel clockwise to select the communication panel; once selected, the missed call icon will appear like this (if you have no missed calls, the voicemail icon will appear, if you have no voicemail, the text message icon will appear and so on):
3. Pressing down on the navigation wheel at a 3 or 9 o'clock position will allow you to toggle in a left-to-right or right-to-left manner from access to missed calls, voicemail, text mail, media mail and all the email accounts you have previously set up (incidentally, pressing down on the navigation wheel at a 6 or 12 o'clock position allows you to toggle down or up all the panels).
Up Next---Communication Quick Takes
* This TimeSaver's m.Tip was written specifically for use with the TimeSaver's Interface. There is no guarantee this tip will work for you unless you have using the TimeSaver's Interface.
TimeSaver's m.Tip: The Best Home Screen For Timesavers Revealed
Combining the Samsung WizPro background image with the sliding panel media home screen layout helps you create a TimeSaver's paradise.
Get access to the following in one convenient screen:
- Time & Date
- Missed Calls, Voice Mail, Text Messages, Media Messages & any Email Account that you have previously set up.
- Daily Appointment Reminder
- Jukebox (immediate access to all songs/music)
- Photo Album (immediate access to all photos/pictures)
- Settings Manager (Change Profile, Access Wireless Manager, Change Ringtone, Change Background Image, Access Task Manager).
Because of the sheer volume of options available to you by adopting this design, I'll break down all the functionality that is at your fingertips in future articles.
For anyone interested in learning how to change their home screen now, follow these simple instructions.
1. Go to Start ---> Settings ---> Display ---> Home Screen.
2. Change the Home Screen Layout to Sliding Panel Media.
3. Change Background Image to WIZPRO.
4. Hit the left soft key button to select Done to make your home screen now look like this:
Stay tuned for additional articles for all the features that can be found on what I'll now reference as the TimeSaver's Interface.
New Project---The Timesaver's Almanac
Now that my m.Web Directories project is well underway, I've decided to take on another project I'm calling it The Timesaver's Almanac.
The Timesaver's Almanac will contain time saving techniques that can be used only with your Samsung Code that will be designed to help all of you get whatever you want done faster.
If any of you are seeking tips that you would like me to cover immediately, please feel free to leave a message below this article.
As the say, "time and tide wait for no man", so I better get to work on this...
Monday, December 28, 2009
m.Tools: If You Use Microsoft Outlook, You Need To See This Free App
I was looking for a way to separate business from pleasure and I think I found a way to do just that.
Business Contacts is a free add-on that allows you to manage all your contact, prospect, and customer information on your smartphone in one easy to use interface.
All you need to use this free plug-in is:
- Outlook 2003 or 2007
- Business Contact Manager (comes free with Outlook 2007)
You can learn more about how to download Business Contacts by visiting this link:
http://www.microsoft.com/downloads/details.aspx?displaylang=en&FamilyID=d9620097-e8f9-41f3-ae66-a7067dac7ace
You can learn more about how to install Business Contacts by visiting this link:
http://office.microsoft.com/en-us/outlook/HA101249971033.aspx?pid=CH101249961033
Here is an added bonus if you decide to use this app---you can double the Samsung Code's contact information storage capacity.
Business Contacts is a free add-on that allows you to manage all your contact, prospect, and customer information on your smartphone in one easy to use interface.
All you need to use this free plug-in is:
- Outlook 2003 or 2007
- Business Contact Manager (comes free with Outlook 2007)
You can learn more about how to download Business Contacts by visiting this link:
http://www.microsoft.com/downloads/details.aspx?displaylang=en&FamilyID=d9620097-e8f9-41f3-ae66-a7067dac7ace
You can learn more about how to install Business Contacts by visiting this link:
http://office.microsoft.com/en-us/outlook/HA101249971033.aspx?pid=CH101249961033
Here is an added bonus if you decide to use this app---you can double the Samsung Code's contact information storage capacity.
First Look: Kinoma FreePlay (The Free Version Of Kinoma Play)
Kinoma FreePlay is more then just a mere media player, it is almost everything you need in one application to find and play videos, music, news, podcasts and more.
Application: Kinoma FreePlay
Website: http://kinoma.com/freeplay/get/
CAB: KinomaFreePlayInstaller.cab
CAB Download URL: http://download.cnet.com/Kinoma-FreePlay/3000-2356_4-10901232.html?part=dl-6312389&subj=dl&tag=button
Features:
Here are some video snippets that give a better idea of Kinoma capabilities:
Mobile Music
Mobile Podcasts
Mobile Search
Mobile Pictures
There is a lot of content on Kinoma FreePlay (and I can't believe that vendor is holding back even more content to motivate you to purchase the retail version), but I'm beginning to believe that this is the "one size fits all" application that is a must have for every Samsung Code user.
Kinoma Play, work less and play more---I'm believing the hype!
Application: Kinoma FreePlay
Website: http://kinoma.com/freeplay/get/
CAB: KinomaFreePlayInstaller.cab
CAB Download URL: http://download.cnet.com/Kinoma-FreePlay/3000-2356_4-10901232.html?part=dl-6312389&subj=dl&tag=button
Features:
- With Kinoma FreePlay, smartphones have digital media functionality that meets and even exceeds what users expect on their personal computers. Kinoma FreePlay does more than access a user’s local video, audio or pictures – it also includes a built-in content discovery system, Kinoma Guide, the most comprehensive catalog of the freshest, most diverse mobile media content.
- Kinoma FreePlay provides on-demand access from your phone to an unparalleled range of content:
- Local files – Play the MP3 music, YouTube video, JPEG pictures, panoramas and audio books on your phone
- Media services – Share your Audible, Flickr, iDisk, Live365, Picasa Web Albums, and YouTube accounts between your phone and computer
- Internet – Explore over 500 GB of constantly updated, free streaming podcasts, MP3 music, MP3 radio stations and audio books from thousands of providers including AOL SHOUTcast , CBS Radio, NPR, Forbes and Reuters.
- Home PC – Access the gigabytes of music, video and pictures on your home PC from your phone – both on-demand streaming and download with ORB
- Streaming podcasts – Instead of tediously downloading and syncing, podcasts you can stream on-demand, so you are always up to date
- Media First user interface – When viewing photos, listening to music, or watching video user elements all-but-disappear to keep the focus on the media
- High quality YouTube – Kinoma FreePlay provides high quality YouTube video by playing the same feeds delivered to your PC, when bandwidth permits
- Integrated search – Search your phone, your home PC and the Internet to quickly find what you want
- Menu pod – A beautifully animated dynamic menu providing fast access to many powerful features
Here are some video snippets that give a better idea of Kinoma capabilities:
Mobile Music
Mobile Podcasts
Mobile Search
Mobile Pictures
There is a lot of content on Kinoma FreePlay (and I can't believe that vendor is holding back even more content to motivate you to purchase the retail version), but I'm beginning to believe that this is the "one size fits all" application that is a must have for every Samsung Code user.
Kinoma Play, work less and play more---I'm believing the hype!
First Look: SPB TV & Watching TV On Your Samsung Code
Some of you that have already seen the videos from cubano2031 may have already downloaded the application and come to the same conclusion that I have, but for those that haven't, here are my thoughts.
Application: SPB TV
Website: http://www.spbsoftwarehouse.com/smartphone-software/tv/
CAB File: SpbTV.arm.cab
Likes:
1. Try before you buy (free trial offer)
2. Ability to purchase application at a 20% discount (an offer was sent shortly after I downloaded the trial version)
3. Problem-free installation
4. Software is compatible with the Samsung Code
Dislikes:
1. Limited TV stations are offered in the trial version.
2. Limited English-based programming offered in the trial version.
3. The program rebuffers after about 1-3 seconds of streaming video in Metro PCS' 1X reception environment (this can be improved by piggybacking off your cable modem connection, but it takes the "mobile" out of mobile TV).
Overall Rating:
I'm speaking to the application author about my concerns now and will post any feedback that might lead to an improvement for Samsung Code owners.
Stay tuned...
Sunday, December 27, 2009
m.Tip: What You Can Do With Your Samsung Code If You Are Ever Abducted By Aliens (Part 2)
In Part 1 of this miniseries, I taught you how to find out exactly where you are---a lot of good that is going to do if nobody else knows where you are though.
You are outnumbered by your "alien" captors and it is time to send out a lifeline and call in the cavalry to rescue you.
Here is how to use MetroNavigator to tell others where to find you.
1. Will in the Where Am I map view, select Menu.
2. Select Send A Place MSG and hit OK.
3. Use the left soft key to select Add to select your "rescuers".
4. You can choose someone from your contact list, recent call log or you can manually enter someone contact info.
5. Once you have chosen all the people you want to send the Send A Place MSG to, select OK.
6. Your rescuers will receive a notification like the one below containing:
- Your Phone Number
- A Personal Message (if you wrote one)
- The Address Where You Are Located (underneath the personal message)
No more then 5 seconds after you sent an SOS to your posse, you overhear one of your captors---they appear to be up to something and I don't know if its safe for you to stay where you are---if you get a chance, make a break for it right out the...
But make sure you read the final chapter before you make a run for it or else...
__________________________________________________
Do you want to see more tips like this one? Check out the m.Tip Library to find all the m.Tips in one convenient place.
m.Tip: What You Can Do With Your Samsung Code If You Are Ever Abducted By Aliens (Part 3)
You are on the run making your get away, but what now and what about your rescue party?
With MetroNavigator, you don't have to leave anything to chance.
Here is how you can find a location nearest you and how you can update your rescue party on your exact whereabouts in real time and more:
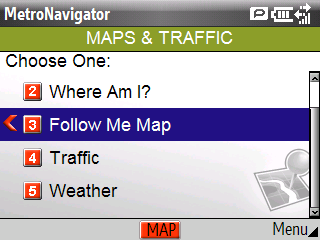
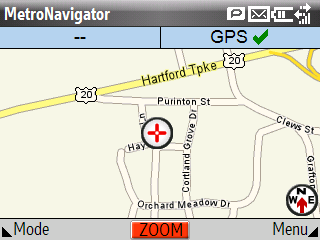
1. From the Maps & Traffic screen, highlight the Follow Me Map and select Map.
2. You exact location will be indicated by a moving X on the map that will tell you where you are in relation to true North and will track your movement.
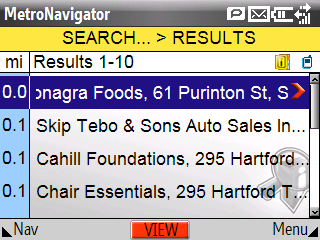
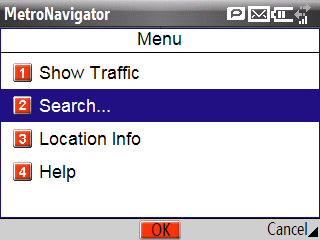
3. Hit your right soft key button to select Menu and highlight Search and select OK.
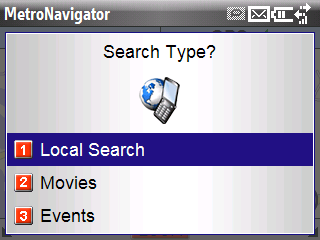
4. Highlight and select Local Search.
5. Leave the What section blank (this will search everything regardless of category or type in your immediate vicinity) and select Find.
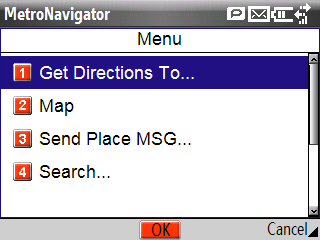
6. While highlighting the location and selecting Menu, you can:
- Get directions to this location from where you are at right now.
- Redraw a map showing where you are in relation to where you want to go.
- Send a Place Message (See Part 2 for further details)
- Conduct another search
__________________________________________________
Do you want to see more tips like this one? Check out the m.Tip Library to find all the m.Tips in one convenient place.
m.Tip: What You Can Do With Your Samsung Code If You Are Ever Abducted By Aliens (Part 1)
For those not living in New Mexico or rural parts of Nevada this might be a bit of stretch, so feel free to insert another scenario in place of the alien abduction (got drunk last night and woke up in some strange place with a "coyote ugly", you are a party at a stranger's house and your friends bailed on you, your blind date brought you some where "sketchy", etc.).
If you ever find yourself in strange surroundings, use MetroNavigator to help you figure out exactly where you are.
1. Go to Start ---> Metro Apps ---> MetroNavigator start the application.
2. Turn the navigation wheel and highlight "Maps & Traffic" and select OK.
3. Select "Where Am I" and select Map.
4. MetroNavigator will show you where you are on the map (which you can zoom in and zoom out at will) and a banner will appear on the top giving you the exact address of your location.
You aren't out of the woods yet though, stay tuned on what you should do next before...
__________________________________________________
Do you want to see more tips like this one? Check out the m.Tip Library to find all the m.Tips in one convenient place.
Subscribe to:
Posts (Atom)